• Untitled Document

    Join us on March 29rd, 7pm EST

    for the CBEC Virtual Meeting

    All EYO members and followers are welcome to join the fun and get to know the guest speaker!

    See the link below for login credentials and join us!

    March Meeting Info

    (dismiss this notice by hitting 'X', upper right)

E 32-3 Exhaust elbow/riser

Eric B

Learning
Aloha,
Wish there were more of you guys out this way... love to come look at your boats, and go sailing together!

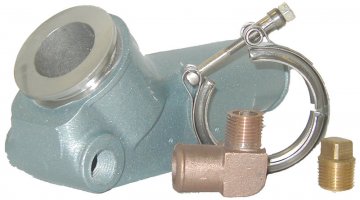
Regarding exhaust.. This is the (upside-down image) riser that is currently attached to my m25 xp. It is toast. The flange is swiss cheese. Hmmm, cheese and hot bread...
universal_exhaust_elbow_45.jpg

drink.png
...

Anyway, I have a new one of these all ready to go.

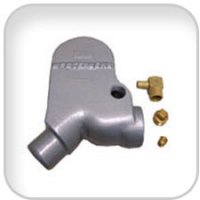
Since my purchase, I have seen images of the m25 xp with this other riser installed:
UNV-200266.jpg

I would like to be enlightened as to whether one of these is better than the other for this engine, in my 1988 E 32-3.
It seems like this second one may have been supplied with the original installation, although, that does not necessarily make it better or worse.

Any help ?

Thanks to all,

Eric
 
Last edited by a moderator:

Eric B

Learning
Exhaust elbow

Thanks Christian! Yes, I have seen that thread, and that is part of what made me seek more info.

Do you know offhand which elbow/riser is on your boat? Do you have an opinion about which would
better? The second image riser goes up a lot higher right out of the manifold, do you think that makes
it more resistant to seawater backflow?

By the way, loved seeing everything you posted, esp the videos, about your voyage to Kauai.

Eric
 

Christian Williams

E381 - Los Angeles
Senior Moderator
Blogs Author
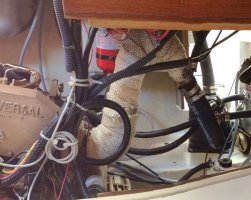
Here's what it looks like, if that helps. I've never had the asbestos off. I think the PO replaced the riser three years ago.

And thanks for the kind words (all the way from Hawaii).

Thelonious exhaust.jpg
 
Last edited:

Eric B

Learning
Riser

Thanks for sending that picture. Interesting..
Location of water lift is different. Mine is straight back of the engine, kind of where your overflow bottle looks to be. My overflow bottle is raised up over by the trash box on the aft facing wall.
Interesting that your plastic tubing for the exhaust fan is raggedy just like mine. I thought the po must have ripped it out, apparently all are custom torn like that. Do you still use your fan? Mine has been disconnected, or broken, intending to repair..
Back to the exhaust, I've seen that in others' pictures, stainless steel wrapped in fg. I guess they all work the same, given that the basic installation guidelines are followed. That's what I am going to look at now. If it will improve the safety factor, I would switch to the riser that goes up higher.
Ah.. I'm draggin on...
thanks for the input Christian,


Eric
 

Christian Williams

E381 - Los Angeles
Senior Moderator
Blogs Author
I tossed the fan and the vent hoses. Only passive ventilation now through the transom cowls. Zero issues.

There are others views on this, as some feel air around diesels should be actively circulated for breathing and against heat buildup and fumes. Apparently there is no requirement for forced vent of our diesels, unlike gasoline engines.
 

Eric B

Learning
Exhaust elbow

Thanks for that info, Christian, I was a bit concerned about how much smell I was getting from time to time. Now, I will see how it is after I have plugged the leaks in my exhaust system.

For all others interested, Vernalift muffler installation guidelines say that the top of the lift should be at least 12 inches below the manifold outlet. After finding this info and taking measurements yesterday, my current riser (the top image in my earlier post) gives me maybe 5 inches at best. So, I have decided to go to the "Westerbeke" brand riser (the lower image) which will effectively increase that distance to about 11 inches.


For various reasons, cost should be about the same, installation will be simpler.


Eric
1988 E 32-III
#747 Liliana

:egrin:
 

ref_123

Member III
I have put in exactly what is on your second picture a couple years back, using a kind help of the forum combined intelligence... I have Universal M-25, from 1986. Worked like a charm. But your set up does look different.

Regards,
Stan

E32-3 1986 "Fire Eater"
 

Eric B

Learning
Exhausted...

Interesting, Stan. I would like to see a picture of that, especially how it all connects up to the water lift.

In the picture that Christian put up of his boat, the water lift is off center to starboard, and that gives a lot more room to run the hose from the mixer. In my '88, they have installed the lift in the center, right on top of the shaft log. Leaves way too little room to make the two 90 degree turns with those monster exhaust hoses.

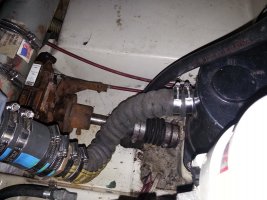
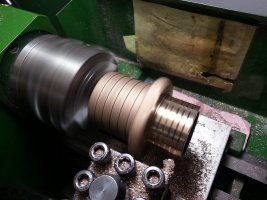
Another p.i.t.a. issue is that the hose connection from the riser is 2", and the hose connection on the water lift is 1 5/8". Fun... I couldn't find the proper sized reducing coupler. So I took a 2" x 1 3/4" bronze barbed/threaded coupler and lathe turned the threaded side down to fit a 1 5/8" hose, and turned barbs in it also.

After all that, I could not get the new 1 5/8 hose to bend enough to make those 2 turns, so for now, I reinstalled the old hose.

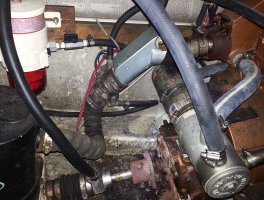
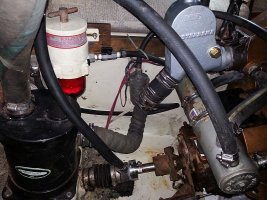
Pics are of old mixer et al, then the new westerbeke mixer installed with new 2" hose, attaching to old 1 5/8" hose.

Old Exhaust.jpgNew Riser Installed 3.jpgNew Riser Installed 1.jpgBronze Coupler.jpg


Still looking for more experienced, and/or professional, advice...


Eric
1988 E 32-III
#747 Liliana
 

ref_123

Member III
I vaguely remember the conundrum with 2 inches... Will take a picture when I am on the boat next time.

I found a reference to a fiberglass coupler somewhere on catalina34.org.

The first snafu was getting the old elbow detached. I spent a year worth of profanities removing three rusty nuts that were attaching the flange to the block. When I removed the last one, I had to use a hammer to detach the flange from the block (who's smart idea was a flange made of iron!?) and then - just when I whacked it for the last time - half a gallon of coolant freely flowed to the bilge... Collective wisdom just smiled at this point :).

The next issue was getting the new elbow fixed on a nipple in the flange. I screw the whole thing on tightly using a big vise and pipe wrench in the marina shop. Put in in place, attached the corrugated hose, and... saw the elbow slowly rotating. Took it back to the vise, one more turn, this time using a really big pipe wrench. This time it's in place.... but as soon as I started the engine, that corrugated hose with it's nice twist (just as yours) had enough force in it to rotate the elbow counter-clockwise... So, after a short run of the engine elbow was at 20-30 degrees to the vertical. Finally, a local mechanic took a pity on me and said that it's nearly unavoidable given the setup - force and vibration - and that if I find a way to fix it in place for a few weeks, corrosion with take care of the issue... So, I stuck a piece of wine cork between the elbow and the heat exchanger - I dropped in a 3-inch one at the same time - and it held the elbow in place. I removed that cork about 6 months later, and that guy was right - the elbow did not move again! BTW, he refused the payment and only took a can of beer for the inspection of my work...

So, it all worked out... in the end...

Regards,
Stan
 
Top