• Untitled Document

    Join us on April 26th, 7pm EST

    for the CBEC Virtual Meeting

    All EYO members and followers are welcome to join the fun and get to know the guest speaker!

    See the link below for login credentials and join us!

    April Meeting Info

    (dismiss this notice by hitting 'X', upper right)

installing new head holding tank on Ericson 32-2 1970

danwalton

New Member
Time to bite the bullet and install a holding tank on our sail boat for the SF bay area (Jack London Square). Our basic plan to buy something from Ronco that will fit in the "hanging area" behind the head. I think I have a basic idea of how to select the tank, but I'm not sure how to deal with ports and hoses etc. I'm probably on a little more of a time budget then a $ budget, but as always want to be efficient. For my first post I thought I ask you experts for tips, suggestions, or other pointers to help me keep things as clean and simple as possible.

thanks everyone!
 

Loren Beach

O34 - Portland, OR
Senior Moderator
Blogs Author
Other owners can assist you better if they know which of the several waste handling options you wish to have.

Starting with the Head (aka toilet), (1) the waste can go next to a holding tank and thence to a deck pump out. Simple and legal everywhere.

(2) or go either overboard via a Y-valve OR to your holding tank and from there like the above...

(3) or use the more choices-and-complications scheme of the 80's Ericsons... and not only have the initial choice of pumping overboard but also use a separate hand pump to empty the H.T. overboard as well.
This assumes that you sail in an area where you have legal offshore room to deposit your waste overboard, whether directly or the accumulation from your tank.

Our '88 model has the complex version with more valves and hoses, but we liked it a lot on our recent trips way offshore up and down the Washington coast where we could use the overboard option.

The amount of room to install hoses and clamps and part in tight compartments is a really big factor, too. :rolleyes:

Hopefully some owners of sister ships will have descriptions and even pictures to contribute.

Good luck and wear your rubber gloves and keep the bleach/soap combo handy! (Been there, done all that...)
:0


Loren

ps: Ronco is a great company and they will spin-weld in all of the tank fittings exactly where you tell them to.
 
Last edited:

danwalton

New Member
Holding tank options

Other owners can assist you better if they know which of the several waste handling options you wish to have.

Starting with the Head (aka toilet), (1) the waste can go next to a holding tank and thence to a deck pump out. Simple and legal everywhere.
Thanks for the reply!

#1, the simplest option is my favorite. We don't have immediate plans to go too far from harbors and possible pump out stations. My developing plan includes:

*Measuring the compartment behind the head.
*Selecting a tank while making sure it will fit in the doors, etc.
*Cut and bend hoses. (I assume this is done by heating them or something?..)
*Use a hole saw to drill a hold in the deck.
*Purchase some kind of screw close fitting for the top.

As you can see I don't have a complete plan. I assume there isn't some sort of kit. I'm going to have to piece all this out myself.

Thanks!
Dan
 

TakeFive

Member II
Thanks for the reply!

#1, the simplest option is my favorite. We don't have immediate plans to go too far from harbors and possible pump out stations. My developing plan includes:

*Measuring the compartment behind the head.
*Selecting a tank while making sure it will fit in the doors, etc.
*Cut and bend hoses. (I assume this is done by heating them or something?..)
*Use a hole saw to drill a hold in the deck.
*Purchase some kind of screw close fitting for the top.

I would not use the word simple in the same paragraph as "installing a holding tank."

For Phase 1, install the holding tank but put in a Y valve and just wire it in pumpout position.
For Phase 2, if you ever decide to do it, "simply" extend the hose from the Y valve overboard position to a whale pump and then to a 1 1/2 through hull.

Put in the biggest holding tank you can fit. My wife can fill a 15 gal tank in a weekend. Flexible hoses can go anywhere but sewage jams are always in the most inaccessible location. Ease of maintenance is a big issue. Make sure you have easy access to hose clamps. Buy a gasket set when you buy the head. In 5 years, replace everything. Don't wait for a problem. and don't forget to install the vent, preferable away from open ports.

-gary
 

ChrisS

Member III
It's a big job, but well worth it.

I have a 1975 32, and I did this in 2009. Don't fool yourself: this is a big job, and you want to do it right. I just returned home from a week in the Delta, and our family of four filled up a 12 gallon tank in 3 days. But it works well, doesn't smell, and is reliable.

All the information (tank # too) I got from this site. If you can't find the threads let me know and I will see if I can find the Ronco tank #.

Basically, here is what I did:

- put the tank in the vee berth port side space just forward of the head. I made sure to block the tank so it doesn't move at all. I hade to enlarge the opening to get the tank in.
- head pumps to tank. After the tank, there is a y valve that goes to the deck fitting or a macerator.
- I bought hose from Defender, and softened it to get it on the fittings by dinning the end in boiling water. I bought the best hose possible. It still has no smell 5 years later.
- I have a Groco compact head. I head bad things about the cheaper ones.

Let me know if you would like photos and I'll snap some.

Here is the thread I used as a guide:
http://www.ericsonyachts.org/infoexchange/showthread.php?5882-32-2-holding-tank-and-head-replacement
 
Last edited:

Glyn Judson

Moderator
Moderator
Head installation.

Dan, Loren makes all good points and I'd like to add one more thing. I have installed a lot of head systems and the plumbing has evolved to a slight variation of the West Marine "Our Favorite Method" that you can find in the marine head section of andy W/M catalog in one of those blue boxes called the West Advisor. The only variation from that is that I install a plastic T-fitting where they show a Y-valve. This way you totally eliminate the chance of the Y-valve failing which they are prone to doing, plus it reduces the cost by a furlong. I use and recommend Odorlos head treatment for total odor elimination. Contrary to everything we've been told all our lives, smaller is better in this case. We have a 13 gallon holding tank on our boat and are simply judicious about using it too often. Too large a tank, the longer it is between pumping out and renewed head treatment. Our former Ericson 25+ had the same factory installed tank as we have now. Loren is right, Ronco is the way to go, having made several for me over the years including our current one and I've always been pleased. Go for it, Glyn Judson, E31 hull #55 Marina del Rey CA
 

Macgyro

Amazingly Still Afloat
Blogs Author
Doing the same thing on Hull #165

I'm smack in the middle of a big V berth repair plus adding a holding tank. The water tank (28 gallon aluminum tank) broke its mounting and pulled the v berth down with it (about 3"). So I removed the tank (found two major leaks) and I'm now in the process of redesigning the area to incorporate a small holding tank as well. The boat previously had a tank incorporated into the commode, but it didn't work, so I added a used Jabsco and got a 9 gallon tank because I couldn't fit the 13 gallon tank anywhere. I'd love to see photos of other 32-2 installations. Here are some of mine so far:

IMG_0430.jpgIMG_0432.jpgIMG_0433.jpgIMG_0434.jpgIMG_0435.jpg
1: Water tank under V berth
2: New Bilge pump under water tank in V berth. The fiberglass floor pan doesn't allow the water to drain from this area, which is weird because the chain locker drains into this area as well. The water has to get up above the level of the wood before it drains around the floor pan. Probably what caused the collapse. There was lots of moldy wood down there.
3: Commode placement
4: partial view of holding tank
5: Leaky water tank filled in bathtub. Quote from wife:"I never know what I'm going to find in the tub when I come home." Not the first time something like this has happened.

On a side note, I'm going the freshwater head source route with a shutoff and check valve in the line. My through hull for raw water has been decommissioned and I've heard it smells better with freshwater anyway. 28 gallons of freshwater, 9 gallon holding tank. I figure I can refill whenever I unfill without too much trouble.

Dean
1970 E32-2
#165
 

markvone

Sustaining Member
More General Comments/Ideas

I just re-did my entire head, hoses and holding tank this winter. Here are a few tips and ideas:

1) Figure out your most frequent usage regarding which sewage handling option works best for you. There are only four choices: only OB (offshore), only holding tank (inland lakes), mostly tank, some OB or mostly OB, some tank. Setup your system to match.

I am in the Chesapeake, I have little need to pump OB, but want the option for travelling off the coast. I have a variation of Loren's option 3) above that eliminates the Y valve by having two pump-out lines on the tank. I pump head to holding tank. I have two separate pump-out lines on the holding tank, one to the deck fitting, the second line runs to the Whale pump and then to the OB valve. My Whale pump is clean and rebuilt and the OB hose is new. They'll stay that way until I get off the coast. If you can get the pump-out fittings on the top of the tank, I would always use two exits/hoses vs the Y valve for mostly tank use.

2) If the layout works get all the tank fittings on the top of the new tank so potential fitting leaks are minimized. For the pump-out fitting(s), the top location, with internal dip tubes in the tank, keeps sewage from sitting in the hoses and permeating them. My head to tank and vent fittings are high on the side of the tank, but the two exits are low on the side so they have sewage in a short portion of the hose all the time.

3) Use the best hose you can get. This is a job you do not want to redo later with "used" hoses! I used Vetus sanitary hose because it is slightly more flexible than the best from Trident. No need to heat it to bend. The 1 1/2 inch diameter Vetus sanitary hose can bend 90 degrees in 6-7 inches.

4) Double hose clamps on ALL connections.

5) Use a large vent size, or two vents for cross flow per Peggy Hall. Read her book for details on arrangement and fittings. Use the best sanitary hose for your vent too, in case sewage gets in there. My vent was 5/8 clear poly. The run is straight vertical up to the fitting just below the toe rail. I upgraded to a full 1 1/2 vent hose with a stainless thru hull.

6) If you're thinking of adding a tank monitor, add it now when the tank is new and clean. I added a SCAD Solo tank monitor.

7) You can also add a simple visual tank level method if your arrangement allows. I have an access port on top of my tank with a clear cover. I cut a small access above it in the plywood base under a seat cushion. I can move the cushion, pull the plywood access panel and see into the tank for level.

8) I added a freshwater flush option using my head sink drain line. My arrangement is a variation of the setup in Peggy Hall's book. I will use freshwater for my last flush before leaving the boat for a while.

9) Rebuild your head after you have the hoses out and everything cleaned up.

10) Do everything else you need to do while the whole mess is cleaned up and out of you way. I re-varnished the teak trim behind the head while it was out of the boat being rebuilt. Also cleaned up the formica walls.

Mark
 

Christian Williams

E381 - Los Angeles
Senior Moderator
Blogs Author
If doing this job again--it's been 30 years but the memory, ah, lingers----I would memorize Peggy Hall.

Also, it seems to me that our term "holding tank" gives the wrong idea, once the system is up and running. We ought to consider them "temporary tanks". I try to pump mine out after any day use. Some folks leave the spoil for weeks or months, which is kinda unnecessary product testing even for miracle Odorlos.
 
Last edited:

Rick R.

Contributing Partner
I replaced ours a couple years ago with a direct replacement from Ronco. There is nothing worse than poor tank management.

Our marina in a provides free weekly pump outs which is nice but nothing like I would do. Having owned three class A motorhomes over the years, I would not only empty my tank but fill it with fresh water and drain it again before adding chemical. Our Marina jjust dumps, no flush with fresh water.

Read Peggy Hall's book.
 

kapnkd

kapnkd
Time to bite the bullet and install a holding tank on our sail boat for the SF bay area (Jack London Square). Our basic plan to buy something from Ronco that will fit in the "hanging area" behind the head. I think I have a basic idea of how to select the tank, but I'm not sure how to deal with ports and hoses etc. I'm probably on a little more of a time budget then a $ budget, but as always want to be efficient. For my first post I thought I ask you experts for tips, suggestions, or other pointers to help me keep things as clean and simple as possible.

thanks everyone!
We've got a '73 E32-2 and put a holding tank in many years ago. It's located in the V berth storage on the Port side. I do have photos somewhere but can't get to them for a couple of weeks. (We're away from home at the moment.) I will monitor your post and if I can be of help will be glad to do so.
 

Graeme Coleman

New Member
Gravity drain holding tank in Ericson 32-2

Time to bite the bullet and install a holding tank on our sail boat for the SF bay area (Jack London Square). Our basic plan to buy something from Ronco that will fit in the "hanging area" behind the head. I think I have a basic idea of how to select the tank, but I'm not sure how to deal with ports and hoses etc. I'm probably on a little more of a time budget then a $ budget, but as always want to be efficient. For my first post I thought I ask you experts for tips, suggestions, or other pointers to help me keep things as clean and simple as possible.

thanks everyone!

Dan,

You've probably already done your installation, but I wanted to let forum readers know I am just completing installation of a gravity feed tank in my 1975 Ericson 32-2, and it has worked out great. Like others, I first considered the usual locations; under the port side of the V berth, or under the dinette seating, but having chartered several boats (2 Juneaus and a Bavaria) that had a much simplified gravity drain system I became keen on pursuing that option. Doing it this way has made all kinds of sense, eliminating a macerator pump, whilst still allowing for a deck pump out, incorporating a gravity drain through my existing through hull, and as an added bonus, kept all the "toilet business" inside the head itself, plus now I still have the space under the V berth to add an additional fresh water tank, which will be much appreciated.

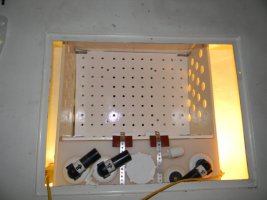
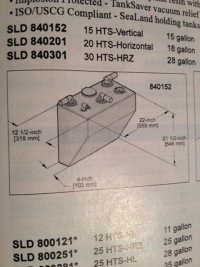
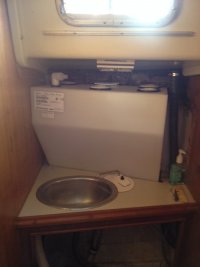
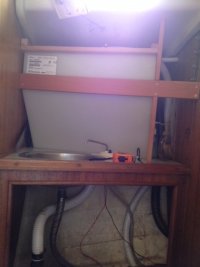
On my boat, the toilet is against the bulkhead to your right as you enter the heads, and there is a counter and sink against the port side hull. It turned out that the space above the counter was just sufficient for a tank (a 15 gallon Sealand SLD 840152, by Dometic), as long as I cut a slot in the counter top to accommodate the bottom of this wedge shaped tank (I didn't even have to move the sink!). Dropping the tank into the slot, with the angled side actually facing towards the sink (not against the hull, as I originally thought it would work), put the tank snugly into the space, and left just enough room above the tank for the top-of-tank plumbing. I did have to go to a local plastics company, however, to have an outlet spin welded into the bottom of the tank for the gravity drain through my existing through hull - the only modification required. The pump out deck fitting we were also able to line up correctly with the top of the tank, and with some careful trimming of the tank fitting we were able to drop the deck fitting (with a very short bit of hose hose already attached) directly onto the tank inlet, and clamp it into place.

So the way this works, of course, is when I want to use the holding tank as a holding tank, I simply close the through hull - the rest of the time (ie., when in deep water and discharge is allowed) I can keep the through hull open and flushing the toilet just lets your business pass through the tank. There is an added advantage to this in that it keeps the tank constantly flushed through, and doesn't allow anything to dry out in there, or become heavy with sludge.

I'm now in the process of framing the tank in with cabinetry, and am happy to report that there is still even some space for a few storage cubbies above and beside the built in tank.

I'll attach a few pics to show how this all worked out, and am pleased to be able to share this alternate way of incorporating a holding tank into the Ericson 32.

Graeme
attachment.php
attachment.php
attachment.php


PS - sorry, I couldn't figure out how to change the orientation of the photos. You can blame me for the crick in your neck!
 

Attachments

  • IMG_3058.JPG
    IMG_3058.JPG
    62.4 KB · Views: 509
  • IMG_0792.JPG
    IMG_0792.JPG
    30.6 KB · Views: 636
  • IMG_0808.JPG
    IMG_0808.JPG
    33.9 KB · Views: 574
Top