• Untitled Document

    Join us on April 26th, 7pm EST

    for the CBEC Virtual Meeting

    All EYO members and followers are welcome to join the fun and get to know the guest speaker!

    See the link below for login credentials and join us!

    April Meeting Info

    (dismiss this notice by hitting 'X', upper right)

Mysteries of the bilge revealed....

leighton

Member I
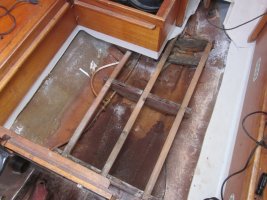
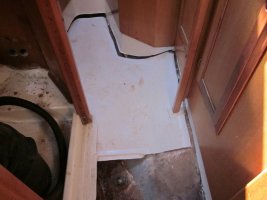
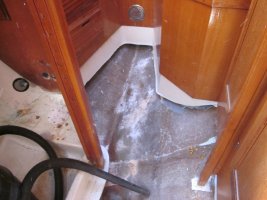
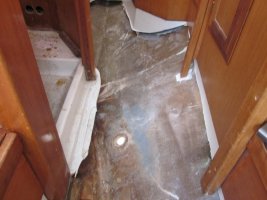
The cabin sole has been a perennial problem on our 1976 35-2, with a crack extending from the bilge hatch beside the engine that made crunching sound when stepped on. Plus, my dear wife wants a saltier interior, and envies those yachts with teak & holly underfoot.

I've always wondered what was lurking down there:
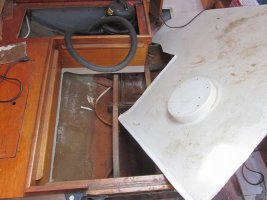
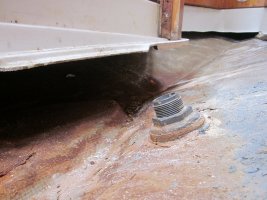
Cabin Sole Removal 1.jpgCabin Sole Removal 2.JPGBilge.JPG

Shows what a Sawzall and a willing hand can do.

The assorted bits of lumber are flimsier than they appear, but surprisingly there was not much springiness around the settee and table base, probably due to the encapsulated 3/4" plywood. Must have been an early approximation of the Triaxial Force Grid, refined in the Mark III.
Though there was rust aplenty, it had not stained the underside of the sole so I don't think the water level had ever risen that far. However, the base of the mast compression post is a horror of decomposition that resembles a chunk of iron ore. More on that to come.

For now it is cleaning and grinding and vacuuming down to an epoxy-friendly surface, while pondering next steps.
 

Lucky Dog

Member III
don't stop, don't stop! We have a 35II also and would like to venture down to the depths of her soul, but fear never get things back together. There was a option for a bilge water tank that must have been installed before putting the boat together. So don't stop with the pictures.

mark
 

PDX

Member III
The cabin sole has been a perennial problem on our 1976 35-2, with a crack extending from the bilge hatch beside the engine that made crunching sound when stepped on. Plus, my dear wife wants a saltier interior, and envies those yachts with teak & holly underfoot.

I've always wondered what was lurking down there:
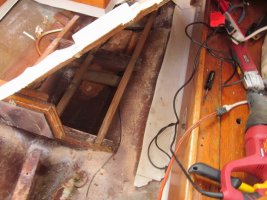
View attachment 13671View attachment 13672View attachment 13673

Shows what a Sawzall and a willing hand can do.

The assorted bits of lumber are flimsier than they appear, but surprisingly there was not much springiness around the settee and table base, probably due to the encapsulated 3/4" plywood. Must have been an early approximation of the Triaxial Force Grid, refined in the Mark III.
Though there was rust aplenty, it had not stained the underside of the sole so I don't think the water level had ever risen that far. However, the base of the mast compression post is a horror of decomposition that resembles a chunk of iron ore. More on that to come.

For now it is cleaning and grinding and vacuuming down to an epoxy-friendly surface, while pondering next steps.

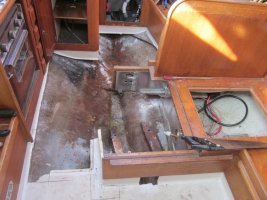
Do you intend to replace the entire substructure? If you're going to go to that much trouble, you might want to consider bringing the fore and aft pieces (that appear to only support the cabin sole from the pictures) all the way down to the hull. Pretty sure that is how they did it with the TFG. It will make the boat much stiffer front to back and provide more keel support.

Please keep the pictures coming. I'm anxious to see what the areas adjacent, including the compression step, look like.
 

PDX

Member III
Beneath the cabin sole and the compression post I have a solid piece of teak, 4 x 4, or so. Repeated wet and dry cycles have taken it's toll. I read of somebody using a piece of PVC pipe filled with epoxy, on end, for this and think that I will try it.

Maybe I misunderstand the dimensions of this piece, but if it will replace a 4 x 4, and if you're going to be using neat epoxy, it sounds like a big slug of it to go off at once. Epoxy in that amount will generate tremendous heat. Look for the slowest hardener you can find.

I would be tempted to use vinylester. Its much easier to work with than epoxy. It stays green the next day so you don't have to sand between layers if you choose to do a gradual layup. If this area is constantly under water, epoxy is the way to go. And, vinylester or epoxy, I would do a layup with a series of cut glass rounds. The finished product will be lighter, stronger, and more flexible.
 

Guy Stevens

Moderator
Moderator
That isn't very structural

Epoxy in a PVC tube is not a structural solution. Epoxy resin without a structural system (like glass fibers) is brittle, week, and subject to stress cracking, shattering and a whole host of other woes.

I would recommend that you cut some g-10 pieces and epoxy them together as necessary.

Guy
:)
 

leighton

Member I
Some Answers

The engine is in the cabin, under the settee. The stringers are very rusty too, but solid; I'll probably replace them anyway.
IMG_6895.jpg

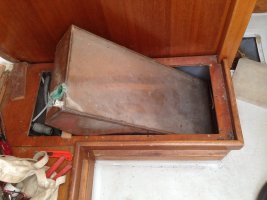
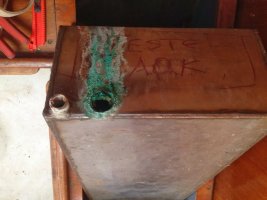
I will reinforce the sole with members glassed to the hull à la TAFG, but I'm thinking about installing a water tank beneath the sole in the area beside the settee. I pulled out the old water tank that was under the seat, but don't plan on reusing it even though it is "AOK" as you can see:
AOK.jpgIMG_9528.jpg

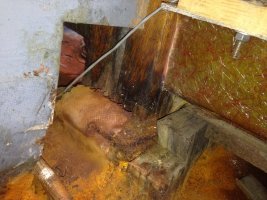
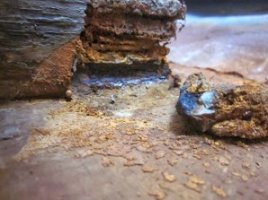
The support for the mast column is clearly in need of replacement. I know that others have used steel or oak encapsulated in glass. I'm looking at structural fiberglass as Guy suggested, stacking up pieces of G10 to spread out the load on the hull. It will depend on how things look when I take the sole out beside the head. Originally I was planning on keeping the shower pan in the head, but after pulling out the old Raritan I'm having second thoughts. You can see that the old support appears almost more geological than nautical:
Mast support base.jpgMast support base corroded.JPG
 

Lucky Dog

Member III
Very interested in your project. Particularly the water tanks. Spent the day on the roof removing ice dams. Your progress is just what need this long cold snowy winter. Don't stop
 

leighton

Member I
Going Forward

Can't really stop now, half the sole is on the ground beside the boat. Here goes the rest of the sole:
IMG_6950.jpgIMG_6956.jpgIMG_7010.jpg

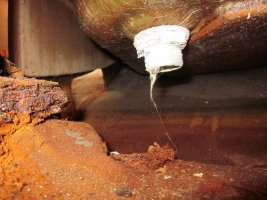
The hull fitting was for a speedo, which I'm not putting back, so I'll patch that hole. Here's a look under the shower pan - it is suspended from the settee bulkhead. Also a glimpse of the rusted mast support. More on that to come:
IMG_6985.jpgIMG_6978.jpg
 

garryh

Member III
to be continued..? :)

these pics are invaluable. I have just bought a '78 35-2 which I will call a project. I have this job coming at me pretty soon. Did this thread just end or jump somewhere else..?
And one quick question (of 200)... where is the low spot of the bilge for best location of pump and access..? Much appreciated. Garry
 

leighton

Member I
these pics are invaluable. I have just bought a '78 35-2 which I will call a project. I have this job coming at me pretty soon. Did this thread just end or jump somewhere else..?
And one quick question (of 200)... where is the low spot of the bilge for best location of pump and access..? Much appreciated. Garry

The quick answer is that the lowest spot in the bilge when the boat is afloat is just below the forward engine compartment bulkhead, and that is where the bilge pump intake was located.

Sadly, nothing has happened since posting those last photos, except for grinding down the rough spots in the bilge where the engine mounts were rusting away. I also poured a bit of thickened epoxy to fill in some low places, but nothing substantive. Work got in the way of boat repair.
 

garryh

Member III
thanks Tom. Sorry you have not been able to proceed with the project, life and work unfortunately have a way of doing that.
When I bought my soon to be previous boat (Pearson 30) the PO had drained the oil into the bilge. No I have no idea why someone would do that :-|
I could not stand the thought of it so I cut out the entire cabin sole to clean it all out. This is not a job I has expected to do ever again!
My plan with the 35-2 after seeing your pics is to cut it out in sections and replace or fortify where necessary, create flanges and glass it back in place and finish with NuTeak or similar. Teak and holly would be lovely but I think a bit ambitious for me.
I will also plan more ready access to the bilge both with readily removable panels and with some larger fixed in place panels for periodic removal and clean out. The existing panels seem to be totally inadequate.
Hope you can get back to it soon... Spring has arrived :)
 

Will Brewster

New Member
Thank you for the photos of the unseen. They are invaluable in understanding the bilge.

I have a 1976 32-2 that is getting some much needed restoration. So far, I have put a 2x6x6 slab of G-10 on the keel to replace the rusted slab of steel that gave way to the cabin roof, which in turn cracked along side the support post. This I repaired by inserting a 2x7x3/4 block of G-10 into the beam while jacked up and then I've laminated 5 1/8 inch G-10 sheets about 24 inches long to that beam. The support post will bear against the G-10 reinforcement which extends from a few inches to the port side of the post on one side and all the way to just short of the bulkhead on the starboard side.

In addition, I've removed three bulkheads and am very close to replacing them with okoume plywood, epoxy and 1708 biaxial tape.
 

tenders

Innocent Bystander
Thank you for the photos of the unseen. They are invaluable in understanding the bilge.

I have a 1976 32-2 that is getting some much needed restoration. So far, I have put a 2x6x6 slab of G-10 on the keel to replace the rusted slab of steel that gave way to the cabin roof, which in turn cracked along side the support post. This I repaired by inserting a 2x7x3/4 block of G-10 into the beam while jacked up and then I've laminated 5 1/8 inch G-10 sheets about 24 inches long to that beam. The support post will bear against the G-10 reinforcement which extends from a few inches to the port side of the post on one side and all the way to just short of the bulkhead on the starboard side.

In addition, I've removed three bulkheads and am very close to replacing them with okoume plywood, epoxy and 1708 biaxial tape.

Will, do you have photos of the problem and/or the solution? I think I've done a repair to solve a similar problem but I couldn't see anything amiss at the foot of the support post - the problem was under the mast. Note that the '69 E32 might have a few different structural bits than your '76 - there was plenty of room for improvement.

http://www.ericsonyachts.org/infoex...?13256-Seeking-advice-on-E32-mast-step-repair
 
Top