E29 handrail question

paul culver

Member III
Unlike what is shown in the owner's manual, my handrails are topside only (not through bolted to an interior handrail). The forward and aft ends are through bolted but the intermediate bolts go into threaded collars embedded in the fiberglass. In removing the bolts to rebed the rails, one of the collars came out. I'm wondering if anyone on this site can provide advice on how best to deal with this.

Paul
E29 "Bear"
 
Last edited:

adam

Member III
Unlike what is shown in the owner's manual, my handrails are topside only (not through bolted to an interior handrail). The forward and aft ends are through bolted but the intermediate bolts go into threaded collars embedded in the fiberglass. In removing the bolts to rebed the rails, one of the collars came out. I'm wondering if anyone on this site can provide advice on how best to deal with this.

Paul
E29 "Bear"

The inside handrails are great. I can't imagine not having them in my E29.

It's a pretty big project, but have you considered making some inside handrails, then just through bolting everything?
 

paul culver

Member III
Inside rails are great in rough conditions but I'm tall enough that I don't want to add more places to bash my head. I'm also hoping to avoid any solutions that involve a lot of drilling and epoxying, like some of the ones I have found on this site. Maybe I'm asking too much?

Paul
E29 "Bear"
 

clp

Member III
With a nickname like "Bear", I certainly think I understand your headroom concerns. I guess I feel the same way, because I am right now in the middle of the identical job, and stand over 6 feet myself. What a SUPER pain in the 'chris rock' it is to remove them. And I stripped one out as well. I swear, I'm thinking about trying to overdrill it, and find a 1/4" toggle bolt to fix it, I only killed one of them. I've already thought long and hard about how to epoxy a nut under that thing, but I promise you THAT ain't gonna happen. The other train of thought seems to be to just drill out another 'bung hole' of sorts just like what is on the ends of them, and put a simple nut underneath. Then put a wine cork in the hole and make up some cool sounding lie about its function. But it will be one of the two before I get crazy trying to repair it back like it was. Which is pretty pitiful in my opinion. Even the handrails proper look kind of cheezy, and if it didn't look so much like a C, or Mac, or worse, I even thought stainless.

At first I thought, this is nothing. I've got a brand NEW set of seven loop rails, but guess what? Go ahead, guess. Yep, the loop length is different. Sometimes I wonder if it is not a conspiracy to turn sailors into drunks. But seriously, drilling it on out and fender washering the thing from inside will probably be the order of the day. Surely a plastic plug can't be that difficult to locate. I'm more than certain I'll have the plug in hand before I drill it though..
 

Randy Rutledge

Sustaining Member
Call md lazy!!!!

I filled the one collar hole that was in my boat (which was the second one over the head) with epoxy and just left that one blank, no flex on the rail at all and no hassles.

go ahead and tell me it is not as strong, I know that.
 

clp

Member III
No Randy, I would call that common sense. It seems sailors, as a rule, tend to be a little OCD, and some of us even worse than that, ie: two steps ahead of having the net thrown over us entirely. Despite my almost daily admonition to my customers to 'Just keep in simple, you ain't gonna wanna fool with that out there', I turn around and create some wiring thingy so complex I start losing sight of its function myself. I try not to regard it as the time vampire all these i-toys or whatnot seem to addict a lot of folks, and proclaim, "But I am fixing it RIGHT!", but even then after some projects I look back on it and think, "Was all that REALLY necessary?" Occasionally. Sometimes though I decide that I should have just left the damn bolt out and got on with my life. It's not a million dollar Oyster, and I'm not launching it to the moon.

I personally regard handrails as simply decoration anyway, and as flimsy as mine are, it seems even worse as it is the illusion of security. My lovely bride is adamant about the silly things though, and has remarked, "But I might slip overboard and get eaten by sharks". No dear. Our sharks don't like Italians . Or the usual that I tell everybody, "It's no difference than a gator. Just poke it with a stick or something, it'll go away." And as big as she is, it would take a mad feeding frenzy to do much harm anyway. And he would probably enjoy the broken piece of handrail instead..

So in retrospect, I think I'm just going to use this rusty nail I found, and then bend it over on the bottom side for added strength. Maybe make a hook out of the bent side and call it custom. I could hang bags of shark chum from it, see if I can't increase their appetite. And it's also why I don't need a plotter, I just follow the trail of broken boat parts floating behind me, along with the empty bottles of MD 20/20, and shell casings. The oil slick helps too.

Alright, sorry folks. I got chased off the boat a week ago, poor weather and pneumonia. Is it evident the lack of oxygen in my system? Bored to DEATH! I think I need another boat.


(Oh yeah, I've gotta tell this one. A few weeks back I bought a little dink or something, whatever. So I go into her office and during the casual encounter mentioned just as calm as I could, "Oh yeah, I bought another boat". When she leaned across her desk, the look on her face was utterly priceless when she almost screamed, "Are you INSANE?" !!!

Well, duuuuhh..
 

paul culver

Member III
Thanks for the suggestions and comic relief. It was quite a challenge getting the bolts out. My power driver couldn't budge them, my manual impact driver couldn't reach them. I ended up using my longest screwdriver turned with a crescent wrench while pushing downward with my chest onto a towel wrapped around the driver handle. I have a nice bruise to show for it. I'll try the anchor insert approach first but I'll bet I end up filling the hole and not using it. It'll be our little secret.

Paul
E29 "Bear"
 

clp

Member III
Yeah Paul, sounds JUST like mine. I did manage the impact a little, and I mean I was beating the ever luvin hell out of it. I got so frustrated I said I don't care if I beat the damn thing completely through the boat, it IS coming off. I'm not what you'd call a wimp boy either, but man that is some tough 1/4" bolts. It was hands down the most difficult and aggravating job I've done to ANY boat inna while. Sitting on the deck in nice weather no less. Sweating. Bleeding. Tried to sell my soul to the devil, but he reminded me that we've already got a contract. I hate him..

(And if my 110 lb. paesano sees that last post, I'm cooked).
 

toddster

Curator of Broken Parts
Blogs Author
I had a go at the long ones that go through both outer and inner rails. I got a couple of them out, but... man I didn't have 12 more days for the others. The head doesn't quite fit any screwdriver known in existence. Only the last half-inch is threaded, so an impact driver only breaks the "threads" cut into the wood, so it just turns without backing out. Pretty much the only options are hammering them out from the inside with a drift or cutting into the outer rails enough to get a tool under the heads.

At that point, I figured the outer rails are pretty much toast anyway, so I will break them up at a later date, when I have a week to do nothing else, and something to replace them with.
 

Loren Beach

O34 - Portland, OR
Senior Moderator
Blogs Author
I had a go at the long ones that go through both outer and inner rails. I got a couple of them out, but... man I didn't have 12 more days for the others. The head doesn't quite fit any screwdriver known in existence. Only the last half-inch is threaded, so an impact driver only breaks the "threads" cut into the wood, so it just turns without backing out. Pretty much the only options are hammering them out from the inside with a drift or cutting into the outer rails enough to get a tool under the heads.

At that point, I figured the outer rails are pretty much toast anyway, so I will break them up at a later date, when I have a week to do nothing else, and something to replace them with.

Perhaps I misunderstand the problem a bit... but...
:confused:
I once had to remove a #12 screw from underneath my side deck. It is/was one of the series of "locater screws" that temporarily held the deck down to the hull flange (right after the top of the hull flange was buttered up with a lot of adhesive), just before they placed the slotted alum toe rail on top of the edge of the deck and thru-bolted it - through both frp pieces.

One (!) of that whole collection of screws started to seep some drops of rain water and since there was no way to get at the head of the screw from the top...
I designed a "hollow drill bit" to go up around the threads upwards from the bottom. This left a hole about 3/8" in dia. and I then filled it with thickened epoxy. End of seepage.
:)

My hollow drill (kind of like a very narrow-sided plug cutter?) was a short piece of 3/8 SS tubing. I sawed a pattern of teeth into one end for cutters. It chucked up in a right angle drill and easily cut out a small round plug of frp laminate with the screw in it.

If you are going to epoxy-fill the hole and redrill for a new handrail bolt anyway, perhaps something like that would do the trick.
Maybe, perhaps.

If you have any 70's Ericson with the frp liner, just enlarge the inside access hole to about 1" and then when you are done put in a plastic plug from Ace Hardware. We did this on our prior boat with a full frp liner. The white plugs were a close enough color match that it looked almost like "factory" if anyone really studied it.

Best,
Loren
 

clp

Member III
Oooooh, I LIKE your hollow bit idea Loren. MAN there are some engineers on here. It does in fact sound like you have a grasp on this prob, it sounds about the same. I managed to save the handrails, but it was tough. If I get a moment later, I did take a few pictures that a court of inquiry could use in my next sanity hearing, and I'll throw them out there directly. Yeah Todd, that is an odd screw head. My impact driver had a large flat head in it, considerably bigger than the average 1/4" bit. I busted the side off of one of them during the pounding, it was crevice corrosion, far out. And the plastic plugs wouldn't stand out, there were already five of them. I would have built new ones if it had come to that, but I didn't wanna. A hole saw, jigsaw, and router will do it simply. I might even do it yet, these things are pretty battle worn. Truth is, I wish that I had looked so good after forty years at sea..
 

Randy Rutledge

Sustaining Member
Has anyone considered drilling the head off the screws/bolts and pulling the rail off the remaining stud, that way you can work with the remaining shaft of the screw with the handrail out of the way and use vise-grips . I think that is what I did with the luckily only one that was in an anchor plate in the deck. Remember to conter sink the holes on the deck to allow more room for butyl tape to seal.
 

toddster

Curator of Broken Parts
Blogs Author
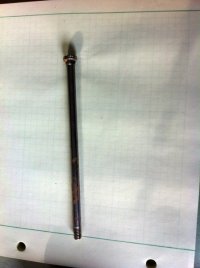
Apart from the fact that drilling stainless bolts is a royal PITA, replacements run around $8 a piece. I think what makes these things so stubborn is that after each bolt is installed, the rail is bent and twisted to line up for the next hole. So the wood itself grips the bolt snugly. For the long ones, that's two rails twisted in opposite directions. In fact, the ones that I uncovered didn't even have a nut on the inside - the friction seems to be all that is holding the rails on. (I didn't drill out all of the caps after I punted on the project, but I didn't encounter any nuts in the ones that I did open.)

Maybe it takes so long because for the first few, you have to figure out what the heck is going on and what is safe to pound on and what isn't. Note the square section just below the head that prevents the bolt from turning until all the surrounding wood is gouged out. Gotta pound these suckers out from below, no question.

Of course, this is a different situation from that described in the OP.
 

Attachments

  • railbolt.jpg
    railbolt.jpg
    39.9 KB · Views: 463

hjohnson

S/V Sagres
Inside rails are great in rough conditions but I'm tall enough that I don't want to add more places to bash my head. I'm also hoping to avoid any solutions that involve a lot of drilling and epoxying, like some of the ones I have found on this site. Maybe I'm asking too much?

I think it all comes down to where they are located (in terms of bashing one's head). On the E27, the overhead rails are more or less in line with the settees, so you're not going to be walking where the rails are. Also, they're highly convenient for hanging things like dish towels and so forth. :)
 

clp

Member III
Ick!! No, mine did not have that bolster on it or I may have just openly wept. Mine were just 1/4"-20 tapered head flat screws that were a SUPER pain to extract. Driving them big suckers out, well, we now know who is the man.:hail:
 

tenders

Innocent Bystander
My hollow drill (kind of like a very narrow-sided plug cutter?) was a short piece of 3/8 SS tubing. I sawed a pattern of teeth into one end for cutters. It chucked up in a right angle drill and easily cut out a small round plug of frp laminate with the screw in it.

Dang, that is clever, Loren. Good Old Boat-worthy. Please send it to them.
 

frick

Member III
simple fix to this problem

I had the same problem with two rusted nuts in the deck.
I first drilled out the plugs in the hand rail.
Then Removed the old bolt.
I then drilled until the bit was through the deck, but not through the headliner.
Mixed up a batch of 2part 5 minute expoxy and filled the hole creating an expoxy plug between the deck and the headliner. I gave it and hour to dry.
Then i drilled throught the plug and headliner and placed a new bolt with washer and acorn nut inside the boat.

I had zero compression on the headliner and thne acorn nuts are nice and clean.

After all that i put a new teak plug in the hand rail, and refinished it.
 

Hanktoo

Member III
tackling this job in my 35-2 . My handrail has 9 count em 9 contact points. The first six are through bolted to a handrail inside. Got that out, with the aching muscles to show for it. The last 3 must be as you describe with a collar under the deck as these are over the head on the port side with nothing coming through the headliner.

Paul do you have a picture of the collar that came out?

yeah that doesn't sound too strong, but heck if it lasted 40 yrs someone must have yanked on it pretty good in that time.

Frick if I get this out I think i'll go with your method, I am not too worried what the headliner looks like in the head. May give folks something to contemplate in those moments.
 

Hanktoo

Member III
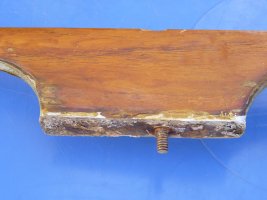
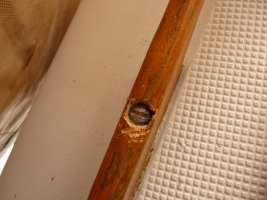
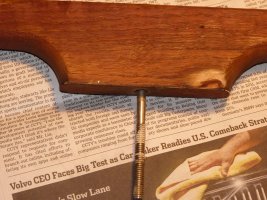
P1070942.jpgP1070929.jpgP1070920.jpgwell the mystery of the attachment of the last 3 rungs is solved. Little surprised at the answer. Almost the entire rung is threaded, with the flat head just below a very shallow bung. The end only protrudes about an inch into the deck and I don't believe it threads into anything there.
My plan is to drill through , I think it will come out in the head area and put in a backing plate , large washer and nut.
Pics attached (I hope)

Last pic is the other six which are thru bolted to the handrail in the cabin. Actually that's the cabin handrail shown
 

toddster

Curator of Broken Parts
Blogs Author
The one that's like that above my head has a nut rusted onto it, and I can't see any way to get it out without destroying the railing. Which I guess I'll do at some point, since they are getting pretty shabby looking. And that bolt is leaking. If you can, I'd replace that bolt with something that has a hex head, so you can actually put a wrench on both ends when it gets to the state that mine is in.
 
Top