Rick R.
Contributing Partner
For once, a boat project that went as planned!
Last summer, after all of the other upgrades we made with Garhauer blocks, EZ Track Genoa Cars, Radar tower with engine hoist and davits, I decided I wanted to upgrade the traveler as well.
Garhauer is staffed with friendly and amazing people. I worked with Mark and was then handed off to Guido to talk details like the bend, bolt holes and etc. If you simply send them your traveler bar they will make a new one to match your boat. However, we sail several days every week,year round. I just couldn't stand the thought of surrendering our traveler for2-6 weeks. Guido, had an alternative !
Back to the boat I went with a tape measure in hand and Guido on the phone. He had me measure the distance between the bolt holes, the drop at the end of the track, the track height, width and length. Although I hoped for the best, I wasn't expecting things to go trouble free. Well, that's relative.
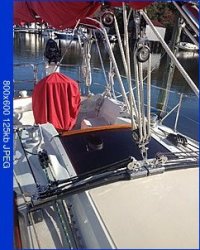
Removal of the original
I was not looking forward to this part. I had searched the forums here and asked a lot questions. Some had to remove their spray hood, some made special tools to reach under the main hatch, Tom Metzger manhandled his with an impact wrench. Some had a nuts or a piece of stock glassed under the spray hood so hopefully there would be no need to remove the spray hood or make a special wrench.
The first thing I did was to buy a large Phillips head screw driver that would fit the large 1/2 ss screws. To my astonishment, I was able to loosen all but two in the cabin top. They came out without hearing a nut drop over the hatch. Whoopie!
The other four I had to drill out, done.
Next step butyl
Taking a countersink bit, I followed Mainesail's admonition to create a space for the butyl to seal around the screws.
Lined up the traveler,the holes all matched!
Start to finish, the entire job took less than three hours. I will be selling the old traveler here if anyone needs it.
Last summer, after all of the other upgrades we made with Garhauer blocks, EZ Track Genoa Cars, Radar tower with engine hoist and davits, I decided I wanted to upgrade the traveler as well.
Garhauer is staffed with friendly and amazing people. I worked with Mark and was then handed off to Guido to talk details like the bend, bolt holes and etc. If you simply send them your traveler bar they will make a new one to match your boat. However, we sail several days every week,year round. I just couldn't stand the thought of surrendering our traveler for2-6 weeks. Guido, had an alternative !
Back to the boat I went with a tape measure in hand and Guido on the phone. He had me measure the distance between the bolt holes, the drop at the end of the track, the track height, width and length. Although I hoped for the best, I wasn't expecting things to go trouble free. Well, that's relative.
Removal of the original
I was not looking forward to this part. I had searched the forums here and asked a lot questions. Some had to remove their spray hood, some made special tools to reach under the main hatch, Tom Metzger manhandled his with an impact wrench. Some had a nuts or a piece of stock glassed under the spray hood so hopefully there would be no need to remove the spray hood or make a special wrench.
The first thing I did was to buy a large Phillips head screw driver that would fit the large 1/2 ss screws. To my astonishment, I was able to loosen all but two in the cabin top. They came out without hearing a nut drop over the hatch. Whoopie!
The other four I had to drill out, done.
Next step butyl
Taking a countersink bit, I followed Mainesail's admonition to create a space for the butyl to seal around the screws.
Lined up the traveler,the holes all matched!
Start to finish, the entire job took less than three hours. I will be selling the old traveler here if anyone needs it.
Attachments
-
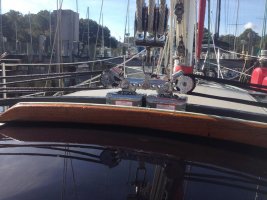 image.jpg101.8 KB · Views: 82
 -
 trav imageR.jpg30.1 KB · Views: 83
Last edited by a moderator:
")