Sliding companionway hatch rails not parallel on purpose?

klb67pgh

Member III
I am building a new companionway sliding hatch for my E25. It will be painted rather than all teak to give me some room for error on joinery, with perhaps a varnished teak pull on top. I made a mock side rail to confirm my measurements and angles and ability to use my table saw to cut the necessary grove in the side of the hatch frame for the sliding rail. I discovered the companionway opening is not symmetrical, which is not a complete surprise. However, I also discovered that the stainless (aluminum?) sliding rails are not installed parallel and are also not installed with the same lip - the port side rail edge sticks outboard quite a bit farther than the starboard side. Being mindful of Chesterton’s Fence, is there any reason why it would be intentionally installed not parallel and/or not the same by the factory or perhaps original owner after a refit (the boat was painted by the 1st or second owner at some point)? I see no evidence of the holes being redrilled in another location. It would be little effort to redrill the holes to make the port and starboard sliding rails uniform and parallel, and to fill the existing holes. That should make hatch construction easier. Does anyone else with an E25 or probably E27 have rails that are not installed uniform or parallel? Any thoughts on the matter? Is the unevenness just factory imprecision/error or on purpose? Does it make sense for the rails to taper aft to fore? I've attached a picture with a piece of what is left of one of the original teak hatch frame rails just for reference.
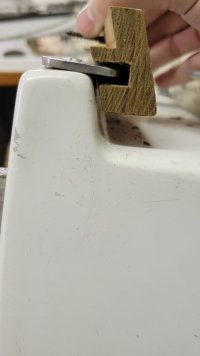
20240219_185131.jpg
 

Christian Williams

E381 - Los Angeles
Senior Moderator
Blogs Author
I can only note that water poured on the sliding hatch runs into the cockpit via the slider design--the groove. Any asymmetricality might reflect such a need to make that happen.

I know this because I drilled holes in the end of my groove, and then had to plug them when the cabin flooded.

Thanks for Chesterton's Fence, which I hadda look up.
 

Prairie Schooner

Jeff & Donna, E35-3 purchased 7/21
Hi KLB,
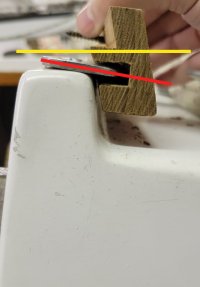
When you say not parallel, do you mean to the top of the fiberglass 'riser' like the yellow line I've added below?
klb hatch je.jpg
Or do you mean not parallel to the other metal rail when viewed from above?
If the former, I'd guess the screws got pulled from weight on the hatch over the years, allowing the rail to tip down.
Though Chris' comments about drainage offer a very good reason why there would be a fence here. I had to look that up too, and I'm a huge GKC fan. Thanks.
Cheers,
Jeff
 

bigd14

Contributing Partner
Blogs Author
That issue bedeviled me as well when I built a new sliding hatch for my E27. In the photo below you can see the port side angles to the outside and it’s more or less level on the starboard side. I think it is just a function of the top of the fiberglass mount being rounded and where on that round surface the rail sits. If I had to do it over again I would probably try to lightly plane a flatter surface in the mount area to accept the rail. I had to enlarge the cutouts in the hatch rails to accept the angle.

1708796008056.png
 

klb67pgh

Member III
Hi KLB,
When you say not parallel, do you mean to the top of the fiberglass 'riser' like the yellow line I've added below?
View attachment 49320
Or do you mean not parallel to the other metal rail when viewed from above?
If the former, I'd guess the screws got pulled from weight on the hatch over the years, allowing the rail to tip down.
Though Chris' comments about drainage offer a very good reason why there would be a fence here. I had to look that up too, and I'm a huge GKC fan. Thanks.
Cheers,
Jeff
Jeff, that's a good question. I meant the rails are not parallel to each other. The fore end of the rails are 37.25" outside to outside, and the aft end spread to 37.75" outside to outside. I'm not so concerned about their angle down - I will cut that same angle in the hatch side rails.
 

bigd14

Contributing Partner
Blogs Author
I meant the rails are not parallel to each other.
Ah. I can’t think of a good reason that they should not be absolutely parallel. There would either be binding or sloppiness at one end of the hatch if angled. You should be able to reorient them parallel?
 

Christian Williams

E381 - Los Angeles
Senior Moderator
Blogs Author
Or it might be that the factory technique was to lay down the rails and let them self-align to the hatch before fastening. Because the grooves in the hatch often didn't come from the shop exactly parallel?

I have noticed such adaptations, which I think result from the fact that the molds and the glass didn't produce fine tolerances. The surface of the TAFG for example looks remarkably flat and uniform. But it's not, and a sole has to be screwed or glued every few feet for solidity. Same with the rudder tube, which is more or less vertical, but the bronze gland, when installed, still has to "float" in 5200 to align with the post. This was said to me by a boatyard, in addressing issues with the inexact measurements of production sailboats.
 
A difference of about half an inch between the two rail spacing isn’t too bad, that could be in spec for all we know. Anything more than about that would seem pretty goofy in my opinion.

Christian’s point above, regarding the self alignment, makes a lot of sense to me but no way to verify. The tiller mount/bronze fitting is not perfectly center aligned (to the raised FRP pad around it) on my E27 which is something I’ve sometimes pondered but seems to be “in spec”
 

Gaviate

Member III
All very interesting which brings to light my thoughts, that sometimes, "within specs" is just intolerable! When its my turn to re-do the hatch I will ensure that the rails are parallel, if not already. Seems easier to fabricate a rectangle that a trapezoid and is sure to slide easier.
 

bgary

Advanced Beginner
Blogs Author
A difference of about half an inch between the two rail spacing isn’t too bad, that could be in spec for all we know.
I wonder if it has a subtle function. Like, when the slider is all the way open it's jammed against the wide-spot on the rails, which might serve to... I don't know, hold it in place? Keep it from rattling under way?

Don't know. Probably giving the builders way too much credit, but it occurred to me...
 

Gaviate

Member III
when the slider is all the way open it's jammed against the wide-spot on the rails,
Agreed that this is plausible, even useful in design but the report is that the widest section is aft which would provide jamming benefit in closed position and make easier to open? Now I am inclined to look closely at other boats to see if this is actual design, my boat is 3hrs away but will check this when I get there in a couple of weeks.
 

Christian Williams

E381 - Los Angeles
Senior Moderator
Blogs Author
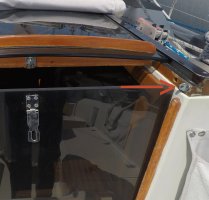
My sliding hatch doesn't bind. In fact on my model it slides entirely out, after removal of exterior stops (arrow)

Photo also shows my error in drilling hole in channel. Er...don't do that.

Hatch Stop w Hole Mistake E381.JPG
 

klb67pgh

Member III
Agreed that this is plausible, even useful in design but the report is that the widest section is aft which would provide jamming benefit in closed position and make easier to open? Now I am inclined to look closely at other boats to see if this is actual design, my boat is 3hrs away but will check this when I get there in a couple of weeks.
Having measurements from a few boats with similar sliding hatch designs would help confirm whether tapered installation of the sliding rails was intentional from the factory, happenstance, or perhaps done to accommodate my specific original hatch that won't be going back on my boat (thus I can do what I want for the new hatch).
 

Christian Williams

E381 - Los Angeles
Senior Moderator
Blogs Author
My model has a piece of wood installed on the deck under the sea hood that the sliding hatch contacts when opened all the way, to stop its travel. Wouldn't want to remove that.
 

Gaviate

Member III
Did a road trip to the boat today and found hatch rails to be parallel, well, within 1/32", so essentially parallel. Helped myself to 2 other boats adjacent to me on the hard and found those rails to be parallel as well. One a Hunter and the other a Catalina, not sure on lengths but one bigger and one smaller than my E27. Seems there are many small subtle differences in these hatches. Mine has a front and back which creates a "cap" type assembly and makes for a positive stop when slid to the coaming, either open or closed. To remove the hatch I would have to disassemble one end, then slide off the rails.
 

G Kiba

Sustaining Member
There is a lot of human labor in production boat making and they still work on Fridays before a three day weekend.
 

bigd14

Contributing Partner
Blogs Author
There is a lot of human labor in production boat making and they still work on Fridays before a three day weekend.
 

Mark F

Contributing Partner
Blogs Author
Did a road trip to the boat today and found hatch rails to be parallel, well, within 1/32", so essentially parallel. Helped myself to 2 other boats adjacent to me on the hard and found those rails to be parallel as well. One a Hunter and the other a Catalina, not sure on lengths but one bigger and one smaller than my E27. Seems there are many small subtle differences in these hatches. Mine has a front and back which creates a "cap" type assembly and makes for a positive stop when slid to the coaming, either open or closed. To remove the hatch I would have to disassemble one end, then slide off the rails.
Hi Gaviate,
You shouldn't have to disassemble your hatch to remove it on your E27. Undo one of the metal slides and the hatch should come off pretty easily.
 

Gaviate

Member III
Undo one of the metal slides and the hatch should come off pretty easily.
Yes, great idea tho I am thinking that the mainsheet traveler, which is atop hatch, won't provide clearance needed to "tip" the hatch and move over and off the remaining slide. Even so, better to move traveler out of the way than to mess with finished woodwork for hatch disassembly.
 
Top