I was taught to keep the FRP temp. down to where I could lay a hand on it at least briefly. Slow warming is better than too high a single-point of heat.
You are using an out of date browser. It may not display this or other websites correctly.
You should upgrade or use an alternative browser.
You should upgrade or use an alternative browser.
Mounting the Last Resort on the E32-3 Sea Hood
- Thread starter vanilladuck
- Start date
peaman
Sustaining Member
Watching anxiously for updates on this, since it is something I, myself would like to get done. Who knows what lurks under the sea... hood?I still haven't been able to remove the sea hood yet. Got all the screws out and tried cutting the sealant around the edges. Probably needs some more digging, scraping, etc.
Well, I do!Who knows what lurks under the sea... hood?
https://ericsonyachts.org/ie/ubs/seahood-leak-repair-part-1-removal.976/
E30-3 - Seahood Leak Repair Part 2- Cleanup and Reinstallation
The seahood is back on and sealed up. I took the seahood home and tried to remove the traveler from it. The screws came out more easily than expected. They were only engaged about one turn in the aluminum plate embedded in the seahood. With the...
I removed the Seahood a few years ago. What really helped me was applying upward pressure using he mainsheet (make sure your topping lift or halyard is attached and tight so you're not relying on a boom kicker). Then I applied Debond 2000 and worked my way around starting at the aft corners. Make sure you remove as much adhesive as you can in the gap between the Seahood and cabin top so the Debond can penetrate better. It takes multiple applications and patience.
Attachments
-
 20220711_192933.jpg167.4 KB · Views: 6
Prairie Schooner
Jeff & Donna, E35-3 purchased 7/21
Bryan,
We had to remove the sea hood to swap out fuel tanks. Nick's info was very helpful for this. The discussion starts at post #30 here:
 ericsonyachts.org
It's for 35-3's, so it will be interesting to see how yours compares.
ericsonyachts.org
It's for 35-3's, so it will be interesting to see how yours compares.
We had to remove the sea hood to swap out fuel tanks. Nick's info was very helpful for this. The discussion starts at post #30 here:
E35-3 replacing fuel tank
Jeff, Also. I think that you can separate the tape from the tank without cutting it. Use a putty knife or chisel and the bond will release. This would make reinstall even easier and no worries about cutting liner. Hi David, Did you need to remove your sea hood (which for me includes the...
@Prairie Schooner - thank you for this link! Very useful to see what's under the 'hood and understand the process Nick and you used.
Today, I scraped the rubbery caulk out of the seam of the sea hood with a paint scraper. I ordered some Debond on Amazon: https://a.co/d/e4kKVEG If I can find a can locally, I will start trying to melt the 5200 away.

Today, I scraped the rubbery caulk out of the seam of the sea hood with a paint scraper. I ordered some Debond on Amazon: https://a.co/d/e4kKVEG If I can find a can locally, I will start trying to melt the 5200 away.
The sea hood is unmade!


It took a bottle and a half of Anti-Bond, which I picked up at a local boatyard chandlery (the DeBond Marine Formula is still on it's way). The bottles are very small at 1.5oz and pricey at $25 each. I still have a few bolts to dislodge which are holding the traveler track. And then I need to start reviewing how to build mounts for the raft cradle.

It took a bottle and a half of Anti-Bond, which I picked up at a local boatyard chandlery (the DeBond Marine Formula is still on it's way). The bottles are very small at 1.5oz and pricey at $25 each. I still have a few bolts to dislodge which are holding the traveler track. And then I need to start reviewing how to build mounts for the raft cradle.
Pete the Cat
Member III
Not sure if this will work for you, but I have used this method to install removable bolts in a deck with success:The sea hood is unmade!
View attachment 49593 View attachment 49594 View attachment 49596
It took a bottle and a half of Anti-Bond, which I picked up at a local boatyard chandlery (the DeBond Marine Formula is still on it's way). The bottles are very small at 1.5oz and pricey at $25 each. I still have a few bolts to dislodge which are holding the traveler track. And then I need to start reviewing how to build mounts for the raft cradle.
View attachment 49592
1. Make a backing plate (I generally use discarded fiberglass in the yard, but have used wood) and embed (or surface mount them if you have room) the nuts in the backing plate material after you have the holes drilled and filled to prevent rot.
2. Goop the backing plate and the holes with West 303 Adhesive filler (this is the stuff they have used to secure winches on racing boats) and make sure the threads of the nuts and the bolts are lathered in mold release wax (any paste wax will work).
3. Fasten the whole thing and leave it. You will need to dry fit everything because you need to be sure that everything will go together when you slather it with epoxy and filler. Just a word of caution; 303 is marvelous stuff and is ridiculously strong--but it cannot be sanded much because it is so hard. But the deck will go before anything fastened with it and I am guessing that is what you want with the liferaft.
You will then be able to remove the cradle (or whatever) and put the bolts back in with some sealant (though you can actually cut threads in this epoxy filler if it is properly mixed) and have a water tight seal.
I have done this for a deck mount dinghy rack, an outboard bracket, and davit installations. Gives you maximum strength and water tight seal and the ability to remove the bracket if you choose to do so.
peaman
Sustaining Member
Pete the Cat
Member III
Indeed you are correct. I am very old and getting more so. Faster.
Nice work. Now, will you through bolt the hood back on to the deck, or use the original wood screws (if that is what you found)?
That's a good question, thanks for bringing it up. I've been preoccupied with the travelers (new/old) and the raft mount so I hadn't thought about this quite yet..
As found on similar Ericson's, the aft fasteners are machine screws which have metal backing plates glassed into the cabin top. The forward fasteners are wood screws. They came out easily but caked with old brown bits of wood. I labeled locations with blue tape:

Drilling, coring, epoxy and through bolting for the wood screw locations makes the most sense to me. I could bed the fasteners with 4200 (or similar?). Similar for the machine screws.
In the process of clearing access, I wound up ripping out the headliner. I'm planning on not replacing it as it hides leaks, mold, and other shenanigans. I'm planning on fairing the roof of the cabin and painting white. Winches, clutches, and items like the sea hood will be finished with backing plates/washers and shiny hex cap nuts. Hopefully this will result in having a nice finished ceiling where leaks are easy to spot. It will also make things a lot easier if any running gear needs to be replaced or modified in the future.
Thoughts?
Not sure if this will work for you, but I have used this method to install removable bolts in a deck with success:
1. Make a backing plate (I generally use discarded fiberglass in the yard, but have used wood) and embed (or surface mount them if you have room) the nuts in the backing plate material after you have the holes drilled and filled to prevent rot.
2. Goop the backing plate and the holes with West 303 Adhesive filler (this is the stuff they have used to secure winches on racing boats) and make sure the threads of the nuts and the bolts are lathered in mold release wax (any paste wax will work).
3. Fasten the whole thing and leave it. You will need to dry fit everything because you need to be sure that everything will go together when you slather it with epoxy and filler. Just a word of caution; 303 is marvelous stuff and is ridiculously strong--but it cannot be sanded much because it is so hard. But the deck will go before anything fastened with it and I am guessing that is what you want with the liferaft.
You will then be able to remove the cradle (or whatever) and put the bolts back in with some sealant (though you can actually cut threads in this epoxy filler if it is properly mixed) and have a water tight seal.
I have done this for a deck mount dinghy rack, an outboard bracket, and davit installations. Gives you maximum strength and water tight seal and the ability to remove the bracket if you choose to do so.
My rigger suggested something very similar: cut discs of G10 to be drilled and tapped with threads. After drilling, coring, epoxy, and redrilling the mount holes in the hood, glass the discs in place. He said G10 tends to hold threads really well. This has the added benefit of not leaving metal under the hood -- nothing to corrode

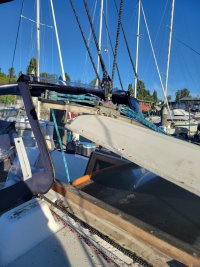
Today the rigger cut out the aluminum plate which was embedded into the sea hood. The through bolts for the cabin top traveler were threaded through the sea hood and the plate. We all know the tale when stainless steel met aluminum. Water had intruded and corrosion had proceeded to the point of practically welding some of the SS fasteners in place. This was the only way to remove them.


Corrosion had advanced to the point of creating more 'powder' and delaminating the fiberglass from the balsa core. They even found some of the balsa core that was wet and cut it out.
There is a chance we'll be repairing the fiberglass and placing the traveler on the bridge deck in the cockpit. Some interesting ideas floating around in:
E32-3 Traveler in the cockpit?
The traveler on the E32-3 is bolted to the sea hood just above the companionway hatch. I'm thinking of moving the new traveler down and aft into the cockpit. It would be fastened about where the mallet is laying on the transition to the companionway in the photo. Pros: More power sheeting the...
Next up: mounting the life raft cradle on the sea hood. I'm letting the rigger help me with this one.
Thanks for the great write up and great discussion Bryan and everyone! It’s a solid example of troubleshooting, perseverance, collaboration on problem solving, and a lot of the knowledge and wisdom sharing that make this site so great.
Bryan I look forward to following your progress all the way to Hawaii and back!
Bryan I look forward to following your progress all the way to Hawaii and back!


Staging the G10 discs. The same size hole saw will be used to carve a void in the underside of the sea hood of the same thickness as the discs. Then the discs will be epoxied in place and glassed over. Holes will be drilled and tapped in the discs for 3/8" fastener bolts. There should be nothing protruding above the sea hood and very little hanging underneath.
I'm measuring tomorrow to make sure the fiberglass over the discs does not interfere with the companionway hatch stops on the deck of the boat under the sea hood.

While you have the sea hood off, you might consider replacing those hatch stops. I found one of the flanges had broken off and the piece was no longer functioning as a stop. They are just scrap pieces of rubrail. I used some small pieces of Starboard I had lying around.the companionway hatch stops
I just filled in the holes where my stops had been and did not replace them. I have wondered why they were there in the first place since my hatch is stopped by the teak on top of the hatch contacting the hood. maybe they're there to prevent a pinch point where users put their fingers on the back side of the trim when they slide it open. It hasn't been an issue for us and if it ever did become a problem, I'd add rubber bumpers to the back side of the hood instead of these internal blocks. If you do decide to replace them, make sure to thru bolt them since they could take a large sheer force when the hatch is slammed open.