Fuel tank cleanout

driftless

Member III
Blogs Author
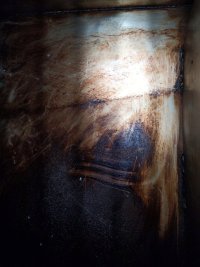
Had some fuel starvation issues last year that seem to have been caused by a blocked pickup tube. I hired this job out to a mechanic with very unsatisfactory results. I'm redoing the fuel system and am now working towards cleaning out my tank. Currently have it pumped "dry" and all the hoses removed for replacement. Looking through the fuel level sender hole I can see a pretty good layer of scum on the bottom of the tank, with trails from where my pump hose scraped it up.

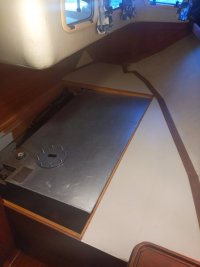
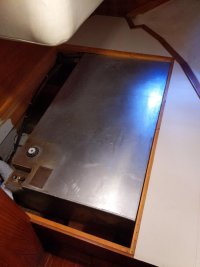
I was hoping maybe I could remove the tank to give it a thorough cleaning, but everything I've read here says it's not going to fit out the companionway. I'm not ready to cut up the tank to get it out. It's not leaking.

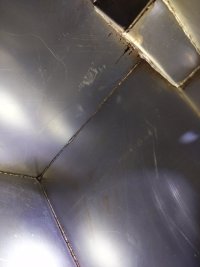
I have a Seabuilt 8" inspection port on order. Any tips on installing that would be very welcome. I haven't been able to determine where the tank baffles are yet. There's no indication I can see on the outside of the tank. My attempts at sounding were fruitless (I can never hear wall studs either). I assume the tank must be baffled.

Any tips and tricks for cleaning would also be welcome.
Just go at it with a rag on a stick? Or with a solvent? A mechanic at the yard suggested "purple engine cleaner".

Thanks as always to all the amazing minds of this forum!
 

Attachments

  • PXL_20230226_184315938.jpg
    PXL_20230226_184315938.jpg
    90.7 KB · Views: 33
  • PXL_20230226_184325831.jpg
    PXL_20230226_184325831.jpg
    154.1 KB · Views: 33

Christian Williams

E381 - Los Angeles
Senior Moderator
Blogs Author
It looks from the photo like you might have enough room to install the inspection hatch without removing the tank cover. If so, bravo.

Baffles are usually identified by spot welds that show (indistinctly) on the exterior. From various photos I've seen it seems that there are many designs of baffles, and numbers of them installed, so yours may be nothing like mine.

If the new port has an 8" opening (my openings are 6"), one would suffice. Cleaning the tank is just rags and solvent. The glop seems to gravitate, so likely most of the junk is low and therefore pretty easy to wipe off even through a smallish port.


driftless

Member III
Blogs Author
It looks from the photo like you might have enough room to install the inspection hatch without removing the tank cover. If so, bravo.
The tank cover is removed in the photo - just once nice big rectangle of plywood on my boat. That's the whole tank (all 4 corners) in the photo.

The other tank photos I've seen in other threads all had different manufacturers on their stickers, so I'm sure you're right that they're all baffled differently.
If the new port has an 8" opening (my openings are 6"), one would suffice. Cleaning the tank is just rags and solvent. The glop seems to gravitate, so likely most of the junk is low and therefore pretty easy to wipe off even through a smallish port.
6" opening, I believe. The overall port with frame is 8" if I'm reading the specs right from my order.

The video is very helpful. If my tank looks similar inside this gives me good hope that one port will be enough to have access to get most of the gunk mopped up.

What would you recommend as a solvent? Kerosene? Bio-diesel? De-greaser?
 

Dave G.

1984 E30+ Ludington, MI
A mechanic at the yard suggested "purple engine cleaner"
I wiped and scraped all the loose stuff & then cleaned the residue/film in the tank with "odorless" mineral spirits. pretty sure there will be baffles but as Christian said the worst of the gunk will be at the lowest point around the pick up tube. Look carefully at the aluminum after you clean it to see if there is any pitting. My 35+ year old tank had pinholes in a small area under the thickest crud caused by lack of maintenance(cleaning) which needed repair.
 

driftless

Member III
Blogs Author
Look carefully at the aluminum after you clean it to see if there is any pitting. My 35+ year old tank had pinholes in a small area under the thickest crud caused by lack of maintenance(cleaning) which needed repair.
How'd you repair the pits Dave?
 

peaman

Sustaining Member
Just go at it with a rag on a stick?
I decided against cutting in an inspection port. I removed my 20 gallon tank to make room for other work. I found that denatured alcohol fuel was pretty good at softening the "scum" inside and I used a couple feet of chain as a scrubbing device. I used some line to create a harness around the tank and hung it from my basement overhead so I could agitate the alcohol while the chain slid around inside. It took three rounds of that procedure before I was satisfied that it was cleaner enough. Openings were sealed during agitation to keep most of the alcohol vapors contained.
 

JSM

Member III
Don't know which boat you have but I had the same issues with our 34-2 a few years ago. I was able to get the tank off of the boat and took it to a shop that specialized in fabrication and repairing semi truck fuel tanks. They cleaned the tank and rewelded two broken mounting tabs for $100.
 

southofvictor

Member III
Blogs Author
Has anyone here heard of putting a drain cock on the low point of the tank? I was talking with a friend who said he had and it was a good way to keep water and the associated gunk from building up. Not sure of the value but if ever I pull our tank or have one rebuilt it might be worth trying.
 

Pete the Cat

Sustaining Member
Has anyone here heard of putting a drain cock on the low point of the tank? I was talking with a friend who said he had and it was a good way to keep water and the associated gunk from building up. Not sure of the value but if ever I pull our tank or have one rebuilt it might be worth trying.
Not sure, but I believe that is against CG regulations--you cannot have a direct drain for any oil or fuel that could end up in the bilge. i think you could possibly put a drain with a permanently mounted hose so you. could suck goop out just as the oil change system on some marine diesels are arranged, but I have never seen that done. I find that it is fairly simple to remove the sending unit periodically (like every two years) because it generally is located over the deepest part of the tank and suck the stuff that collects there. I keep my tank full in the off season and change the O rings on the deck fill, and use Microbor and have very little stuff in them any more when I suck the low point out. I have a cheap ($50) bore scope that is handy for inspection here and elsewhere on the boat.
 

peaman

Sustaining Member
Has anyone here heard of putting a drain cock on the low point of the tank?
I recently bought a manual oil extractor and have found several good uses for it. Depending on how your tank is built, that may be real effective for extracting from the low point. On my boat, if I remove the fuel level gauge, I can see the low point inside the tank, so I used the extractor to pull out the last few drops before I removed the tank. Some electric extractors explicitly warn against using them with combustibles, but there is no chance of sparking with an all plastic manual extractor.
 

driftless

Member III
Blogs Author
I recently bought a manual oil extractor and have found several good uses for it. Depending on how your tank is built, that may be real effective for extracting from the low point.
Great idea. I have an oil extractor but didn't think to use it. I used a drill pump to drain the bulk of the tank but it wouldn't pick up the last puddle from the sump.
 

Christian Williams

E381 - Los Angeles
Senior Moderator
Blogs Author
That worked for me. I had to remove 20 gallons, siphon didn't work, cheap drill pump failed, didn't have a fuel transfer pump. Took a while.
 

driftless

Member III
Blogs Author
Well, my tank has 2 transverse almost full baffles, so if I want to scrub every corner I'll need to add 2 more inspections ports. But I think I got the worst of it taken care of. No signs of pitting inside that I could see. Just used some clean diesel as a solvent, and a bunch of rags and a nice stiff bottle brush to get the gunk out of the welds.
 

Attachments

  • PXL_20230305_174135859.jpg
    PXL_20230305_174135859.jpg
    152.3 KB · Views: 19
  • PXL_20230305_192040106.jpg
    PXL_20230305_192040106.jpg
    83.9 KB · Views: 18
  • PXL_20230305_213344404.jpg
    PXL_20230305_213344404.jpg
    77.1 KB · Views: 18

Kenneth K

1985 32-3, Puget Sound
Blogs Author
Doesn't must of the gunk collect in the lowest point? Can you scope out the sections beyond the baffles and see if it's worth putting more ports in?
 
Top