Burst hose beneath “frozen” floorboards

mike2204

Junior Member
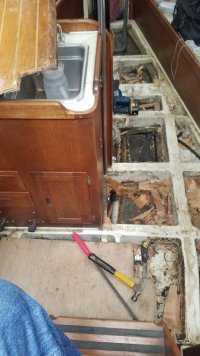
Splashed my ‘88 E34-2 a few weeks ago and filled my water tanks to flush the antifreeze. Quickly discovered a flood over the floorboards while the pressure water was powered up, appearing to be bubbling up right in front of the head. I did my water system winterization last fall as I’ve done for the 7 years I’ve owned the boat, but clearly something ruptured over the winter. My boat lives north of Duluth, Mn., and it gets pretty darn cold here.

My problem is I can’t even come at the break, because I can’t get the floorboard over it to budge. I’ve removed 22 bungs and screws, every fastener in sight, and it’s frozen in place. I put a couple of 2x4 stubs under the floor (via the access hatch to the shower sump pump) and tried prying firmly with a 15-inch pry bar. I got that corner of the piece to move a fraction of an inch but am afraid to apply more pressure for fear of splintering wood I can’t replace (and certainly don’t want to try).

This may simply be the result of 35 years of grit, grunge and heavy foot traffic, but am I missing something? And ideas on lifting this large, seemingly immovable piece without making everything worse?

I’ve searched the forum but cannot find anything parallel.
 

Nick J

Sustaining Member
Moderator
Blogs Author
On my 53-3 a previous owner put a 1/4 teak and holly sole over the original. Screws didn't line up so if I had removed all the new screws it would still be stuck in place with the old ones and no way to access them. Hopefuly yours is different.
 

Pete the Cat

Sustaining Member
Among the most obnoxious construction procedures of Ericson's factory was the penchant for using zip ties to tightly secure the hoses under the floor. This makes removing some of mine a freaking nightmare, if not impossible. I used an bore scope to look and am still trying to think through how to release the bundle they made of hoses. No solution, just a possible insight to the problem.
 

Christian Williams

E381 - Los Angeles
Senior Moderator
Blogs Author
What sort of sole is it? The mid 80s 32-3 had thin ply glued down, and my '84 381 has 7/8th ply fastened with one million ss screws and plugs. (the trim is held down by its own screws, and the sole section by an entirely different set of screws)

I recall continually finding more and more of them.

Glue and screws I don't recall reading about, so I would look again (yeah, I know) for more plugged screws in the plywood veneer.
 

Loren Beach

O34 - Portland, OR
Senior Moderator
Blogs Author
FWIW.... our model does not have the perimeter teak trim pieces, but the T&H sole sections were all fastened with ss screws and teak plugs concealing them. No 'glue' underneath, thank goodness.
That said, I have found that the edges were, in places, forced into place and after some normal swelling from maritime moisture in the air.... were stuck rather well. I did get all the sections out for refinishing, and then sanded down any edges that were too tight when going back into place.
Edit: when doing some sanding on the edges, be sure to take off enough material so that the later 5 coats of varnish will not increase the width so much as to again cause binding when the section is put into place. (Do not ask me how I know this...)
 
Last edited:

mike2204

Junior Member
Thanks for the suggestions, all. Much appreciated. The thought of Ericson gluing the subfloor is more than a bit terrifying. I've also been thinking the "flooding" event may have caused the laminate to soak up water and swell tight, and it's rarely warm enough in June (it's 47 degrees in the marina this afternoon) to promote anything like drying.

There's also a small piece of the flooring angled at 45 degrees at the base of the adjacent fridge/freezer that I didn't disturb....yet. That's 6 more plugs to drill out and screws to remove. I'm confident (people always are) that I've found them all, but I'll recruit another set of eyes to look for plugs camouflaging more screws.
 

JSM

Member III
I have an 87 34-2. Five years ago I installed a new sole and yes, the flooring is glued in. Mine with clear silicone.
Probably your only shot at this is to make a template of the offending piece , rip it out , do your repair and put a new piece in.
Or while you're at it put a new sole and plumbing system in .
 

mike2204

Junior Member
I can't think of a response to John's soul-crushing report, except to go fix myself a stiff drink. Perhaps several.
 

JSM

Member III
John, did your boat have screws also or just glue?
Had both screws and clear silicone as an adhesive. Took the better part of a day to get it out. Used a reciprocating saw, pry bars and chisels to get it up.
 

Attachments

  • cabin sole.jpg
    cabin sole.jpg
    115.4 KB · Views: 21
  • cabin sloe 2.jpg
    cabin sloe 2.jpg
    112.7 KB · Views: 20
Last edited:

JSM

Member III
I can't think of a response to John's soul-crushing report, except to go fix myself a stiff drink. Perhaps several.
Mike, sorry to be the bearer of bad news. I can't remember if that water line was anchored in to the TAFG or not. Maybe you can pull a new one thru using the old one ?
I didn't realize how well these boats are constructed until I tried to take one apart !!
 

Bolo

Contributing Partner
I can't think of a response to John's soul-crushing report, except to go fix myself a stiff drink. Perhaps several.
Mike, I can’t say that I’m familiar with the sole layout of the E34-2 but there is plenty if info on how it’s done on the EYO site. If you’re left with no recourse but to pull up the sole section in question using force which could possibly destroy the sole, take heart in the replacing isn’t that bad. All it takes is money (you own a boat and should be use to that by now) and mostly patience. Like mentioned before, making a template (I used frost acetate) of the existing section is the first step before taking hammer and chisel to it. Even before that cut some temporary flooring from cheaper plywood of equal thickness. You may have to round out the edge on the bottom side to make it fit easier. If you have questions about that part just ask. With a temporary floor in hand go at the existing section. It may just “pop off” like one of mine did or just splinter into pieces like most of mine did. If the latter then you’ll have a temporary floor and template for the new sole. I won’t get into the details of all that here since there is plenty of info on the subject on this site. But in the end you’ll have a temporary to walk on. It’s what I did when I replace ALL of my sole on my E32 which I screwed down, NO GLUE!

IMG_1809.jpegIMG_1894.jpeg
 

mike2204

Junior Member
Well, at least it's clear why I can't budge the piece in question. Thanks for the info everyone. (And here I thought my conversion from CNG to propane would be the season's big project. sigh)
 

Nick J

Sustaining Member
Moderator
Blogs Author
Mike,

I just realized I responded with one of the problems I faced when accessing the plumbing, but didn't mention how I solved the issue. If you need to access a cavity, but aren't ready to replace the whole sole, you can install an access hatch:

https://ericsonyachts.org/ie/threads/bilge-hose-replacement-battle.20284/page-2 (see post 27 and 31 for pics)

It's a little unnerving cutting the sole, but it's a less destructive method than tearing up a glued down floor and will take less time than unscrewing the sole and trim pieces from a screwed down install. Hopefully John's pics above show where the TFG is so you can avoid those areas.
 

mike2204

Junior Member
Had both screws and clear silicone as an adhesive. Took the better part of a day to get it out. Used a reciprocating saw, pry bars and chisels to get it up.
John, do you by any chance have a photo of your removed sole section just forward of the door to the head? I'm pretty sure that's where my plumbing issue is.
 

JSM

Member III
John, do you by any chance have a photo of your removed sole section just forward of the door to the head? I'm pretty sure that's where my plumbing issue is.
Mike, sorry no. That's the only picture I have of the demo.
 
Top